Feb 28, 2009
Maya Live tutorial video
Feb 25, 2009
Video Capture to Animation Pipeline


So here is a list of things that will be needed to complete this task:
- A Video Camera (or two)
- A Suit similar to the ImoCap one
- Some sort of software for capturing the points on the suit that can translate it into 3d motion (Bujou or whatever)
- A rig and presumably Maya
- A room relatively clear of clutter ( a solid colored wall would be ideal)
Pipeline Proposal
1. Get actor into suit and the place where the animations motion will be filmed. Set up the camera to reflect the shot's camera as best as possible.
2. First take a reference shot of actor standing in a neutral pose, arms and legs clearly visible. This shot is important because it is setting up a reference for the distance of all the rest of the shots based off how far our dots on the suit are away from the starting position.
3. Begin filming and acting out the animation. The actor needs to act for animation and perhaps odd proportions if the character is not realistic. This may take some practice, it's one thing to act for live action but acting for exaggerated motion is harder.
4. Get a good take that everyone is happy with. Next bring the video into our motion capturing software. Define the points on the first shot and have it track those for the shot. Hopefully this will give us the basic motion of our actor.
5. Next is to constrain this motion in Maya onto the corresponding parts of our rig. I assume we would use a parent constraint without maintain offset on. Now the part I am not sure about is does each dot correspond to a dot on a control of our rig that is almost identical to our suit or before we bring the data in do we somehow average all the dots on our bands to one point in the center. Then once we have that one solid point that moves around then bring it in and constrain to something similar to a rig we are use to in maya.
6. The data we brought in should be keyframe date for our controls, so next we could go in a delete or change some of those keyframes that we feel do not contribute to believable motion.
7. The last step would be to refine the motion with more traditional techniques. We need to animate the face, hands and feet by hand. As they say in animation, an animation is never finished until the deadline, so keep refining.
I am very aware of how complicated this sounds. I don't know if it's beyond our scope or not. There are few things I don't know, an example is what the best constraints in maya would be to use. Some other questions are is this actually faster? I feel that if we do get a system down where you can record motion and track it then put it into maya, it will be faster. I think a huge problem is actually making this system. We are only 6 people with only a couple programmers. The math involved appears to be very high.
Feb 18, 2009
Posed Based Animation With a Camera
I have been trying to think of ways to keep the essence of pose to pose animation alive while vastly improving the input methods of poses.
Here is my idea, it is somewhat similar to motion capture but not quite. Perhaps I am thinking too much in the realm of what we work with but I feel if it works in our realm quickly, not much development will need to be done.
My idea is to setup a video camera in a very similar to the camera in the shot. Keeping in mind where the character is in virtual space and translating that to our world. The closer to the shot in the computer the better. The animator will be wearing a suit that looks very similar to the curves around our rig now and in the same placement as the rig we are using. These rings will be a very distinct color and will correspond to the nodes on our character in the computer. No fancy mo cap stations will be needed though, it will all be based on the placement and distance of the rings from the camera.
So the idea is this: The animator in the suit gets in front of the camera and acts out the pose he wants as the first frame. This frame will setup a reference to go by for the rest of the shot. Then they shall act out the poses in the scene with the camera taking pictures or video every so often to record the poses.
Now here is the tricky part. Movement that is on the same plane as the camera lens will be easily recorded. It is obvious if the hand moves up and down if shot from the front. What you may be wondering is how it will record movement towards and away from the camera. Well if the camera takes a reference image the first shot, all the controls on the body will be a certain size. My idea to record the movement towards and away from the camera is based on how much bigger or smaller those controls get compared to reference. If the controls become smaller we know its moving away from the camera and if the control becomes bigger it is moving towards the camera.
This idea sprung upon with the notion that we only need to make something look good from the view it is being seen. This lets us only where about animating to our camera.
Some concerns are:
- I am not sure if this would handle camera movements, I feel like it could in some way but it may require an easily moveable video camera.
- I am not sure the changing of the size of controls can translate to distance, I feel like it should but I am not sure of the math behind it all.
- This may be trying to stay to close within the realm of what we have now. The reason I though of this is because not everyone can get a mocap recording studio but I feel like most people can get a digital video camara today. I wanted to keep it within the realm of something possible on a smal scale and large scale.
I also like the idea of recording poses. I feel a big strength of pose to pose animation is the ability to easily delete/change poses. If you have a feel poses that are not work you can simply remake them with little to no trouble.
Performance Animation
I didn't read the whole thing, but the first two/three pages seem to explain it well. I think it's a lot like the wii thing people made last year?
Anyways, it looks like it's just two rods that the animator holds and moves around to animate various parts of the character. It looks pretty cool.
link to download the pdf:
http://stout.hampshire.edu/~tmj05/performance_animation.pdf
Feb 16, 2009
World Building Pipeline Notes from Thursday 2/12
- Back Set Building
- Camera Animation/Layout
- Add + Size Domes/Cylinders or model depending on complexity
- Take object through Priming
1. Automatic UV Mapping
2. Connect Shader
3. Decide whether the shader will be opaque or transparent - Select Object for Painting
- Determine resolution, brush size and type, and color - See results in scene camera
Some thoughts and concerns.:
- First we need to create the shader that is able to be painted on. That shader needs two options, opaque or transparent but still visible.
- It seemed Maya paint could do alot of this but we want to melScript it so its a very streamlined process with as little work as possible.
- It would also be nice to go to photoship if needed.
Feb 15, 2009
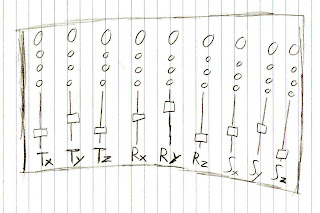
An alternative animation interface

Fairground Layout and Reference Images
Feb 13, 2009
Feb 9, 2009
An article about the pose-based approach to animating
Relevant to this class, he makes the tongue-in-cheek remark that once you've figured out what your poses are, and at what times (largely from video reference), then you're "almost done."
I agree with him, from the creative standpoint. But practically, you still have to pose the character in 3D, get interpolation working on all of your curves, etc. That chews up lots of time. Based on our recent conversations in class, it seems that this is a key spot to brainstorm ways to accelerate the process.
The Ultimate Artist's Tool for Painting a 3D Scene Fast
The main idea is to be able to paint directly on 3D objects.
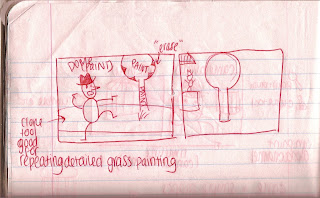
The modeling structure of layered domes for distant background objects and simple models for objects closer in the scene could both be painted on directly. It would be important to be able to paint not only color and texture, but transparency as well. A clone tool would also be useful for repeating detailed textures like grass.
A nice set up would be two windows showing separate camera views.

One would be the main camera view of the scene that will be used in the movie, with a timeline allowing you to scrub through and stop at various frames. This allows the artist to see exactly what will be visible on screen at each point in time. The adjacent window would be a camera view of the scene or of individual objects that the artist could move through and tumble around. This would be the workspace for the artist to paint in. The idea would be that as the artist paints in the workspace, the changes show up in the other camera view as well, letting the artist paint details on an object up close, and see how it looks from the main camera, or whether it is visible at all. In this way, parts of the object that are never visible to the main camera don't have to be painted.

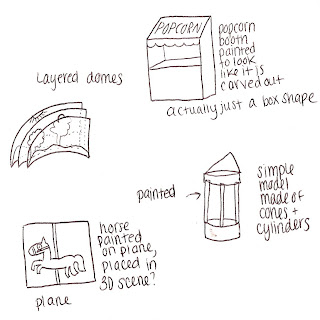
I like the idea of painting layered domes for background scenery such as distant mountains, trees, bushes, sky, etc. For objects more embedded in the action of a scene (such as a merry-go-round, car, or trash can) perhaps a simple model would work better. They could be as simple as boxes and cylinders or much more detailed shapes. Either way, they could be painted to appear to have more depth and shape than the models actually do. Even better would be if transparencies could be painted on these 3D objects. For example, starting with a cylinder for a merry-go-round and "painting away" or erasing parts of it to create the poles, which could then be painted with color to appear rounded.

Feb 8, 2009
Feb 6, 2009
Toy Story Notes Presented at Siggraph in 1995
They talk about how everything in the movie came from the art department and they were not trying to replicate reality, moreso create a stylization of reality.
1.5 years of story development, green light, 2.5 years of animation
Feb 3, 2009
Human-Computer Interaction
I found an article that discusses various methods of human-computer interaction. It could be very helpful in thinking about the other ways we could interact with the computer to animate or light a scene. I'm not sure exactly how helpful it would be towards our ultimate goal of speeding up the entire pipeline, but if we are thinking of alternate computer input methods (such as motion capture) I think this article is a good jumping off point for ideas.
Here's the link to download the PDF:
http://stout.hampshire.edu/~tmj05/interaction.pdf
Wrath of the Lich King Interview
http://www.cgchannel.com/news/viewfeature.jsp?newsid=8144&pageid=0
It is a good read despite some of the fluff at the begin. I also recommend checking out the videos and pictures. They a great idea of what quality level Blizzard is working with. It is a great brief look at what goes into a production.
Feb 2, 2009
questions to get ideas flowing
I have chosen these questions based on the film-side qualities we identified (emotional engagement, believable world) since our next task, presumably, will be to produce those qualities.
- How can we produce compelling facial animation an order of magnitude more quickly than the way we've been taught? Why will your method be so much faster? For background, the "way we've been taught" is the keyframed viseme/blendshape/morph target method. I think the Wikipedia entry on computer facial animation is not half bad for those wanting a little more background.
- How can we produce compelling pantomime/body performance an OOM more quickly than the way we've been taught? Why will your method be so much faster?
- This one is tricky to phrase. How can we translate the visual designs for an original character into a form that we can use an OOM more quickly than the way we've been taught? Note I didn't say "how can we model and rig a character..." because that assumes we will be modeling and rigging like we're used to. We may decide that's the only way to go, but I want to encourage people to think of other ways they might make our character exist in the final film without, perhaps, existing as a fully-rigged 3D object.
- How can we create the illusion of a believable world an OOM more quickly? Why will your method be so much faster?
- Also tricky to phrase. How will we generate the appropriate color field for a frame of our film an OOM faster than we currently do? Once again, I avoid "light" because that assumes some kind of true 3D world model. We aren't yet committed to having that.
- What questions would you ask the producers of today's feature animated films to help guide us in our mission? Why?
- What question(s) should we be asking instead of the previous 6? If you choose this route, please also answer at least one of the questions you propose.
summary of the first class
Assuming 1000 shots in a feature film, we concluded that the economies of scale that come with saving time on per-shot events would exceed savings we might create in a particular per-film task. So we emphasized those areas as good places to explore.
We also considered the films themselves, separate from the processes which made them. After all, one mission of this course is to question the processes. In this vein, we identified qualities that we must be able to capture with our techniques if our techniques are to be competitive with current methods.
The two qualities we identified were "emotional engagement" and "a believable world." The former is really about a connection between the audience and the characters. The latter was trickier to define. It seemed to center around a world that was internally consistent, from the level of physical "laws" to the implied history of the cultures and events that made the world exist. I find it still hard to define clearly.
We identified the following contributors to what we called emotional engagement: facial and eye animation, pantomime/body animation, voice, the staging and composition of the individual shots, the color palette, and music. Basically, this is a list of the stuff we see and hear while enjoying a movie. For the moment we aren't touching story, though obviously the conflicts and desires of the characters are crucial. For our purposes in this class, we want to explore methods for getting the visuals for a tenth of the effort.
After these conversations, we thought about what kind of small production we could pursue in this class that would test our ability to achieve those two aforementioned qualities. The result? A 3 shot film:
- A close up of a character with facial animation (and lip sync).
- A long shot (moving camera) showing the character within a believable world. This should include some ambient motions and parallax.
- A medium shot (or wider) of the character acting out something physically.


